DIY Balloon Arch Tutorial: Step-by-Step for Any Baby Shower Theme
A balloon arch is THE centerpiece of any baby shower — it instantly makes a $20 setup look like a $200 setup. The best part? It's shockingly easy to DIY. No helium needed, no special skills required, and the whole thing costs $15-30 in supplies. Here's your step-by-step guide.
What You Need
- Balloon arch kit — includes balloons, strip tape, glue dots, and tying tool. Pick a kit that matches your theme:
- Hand pump or electric inflator — don't use your lungs for 100+ balloons. Trust us.
- Command strips or tape — for wall mounting. Fishing line for freestanding arches.
- Scissors
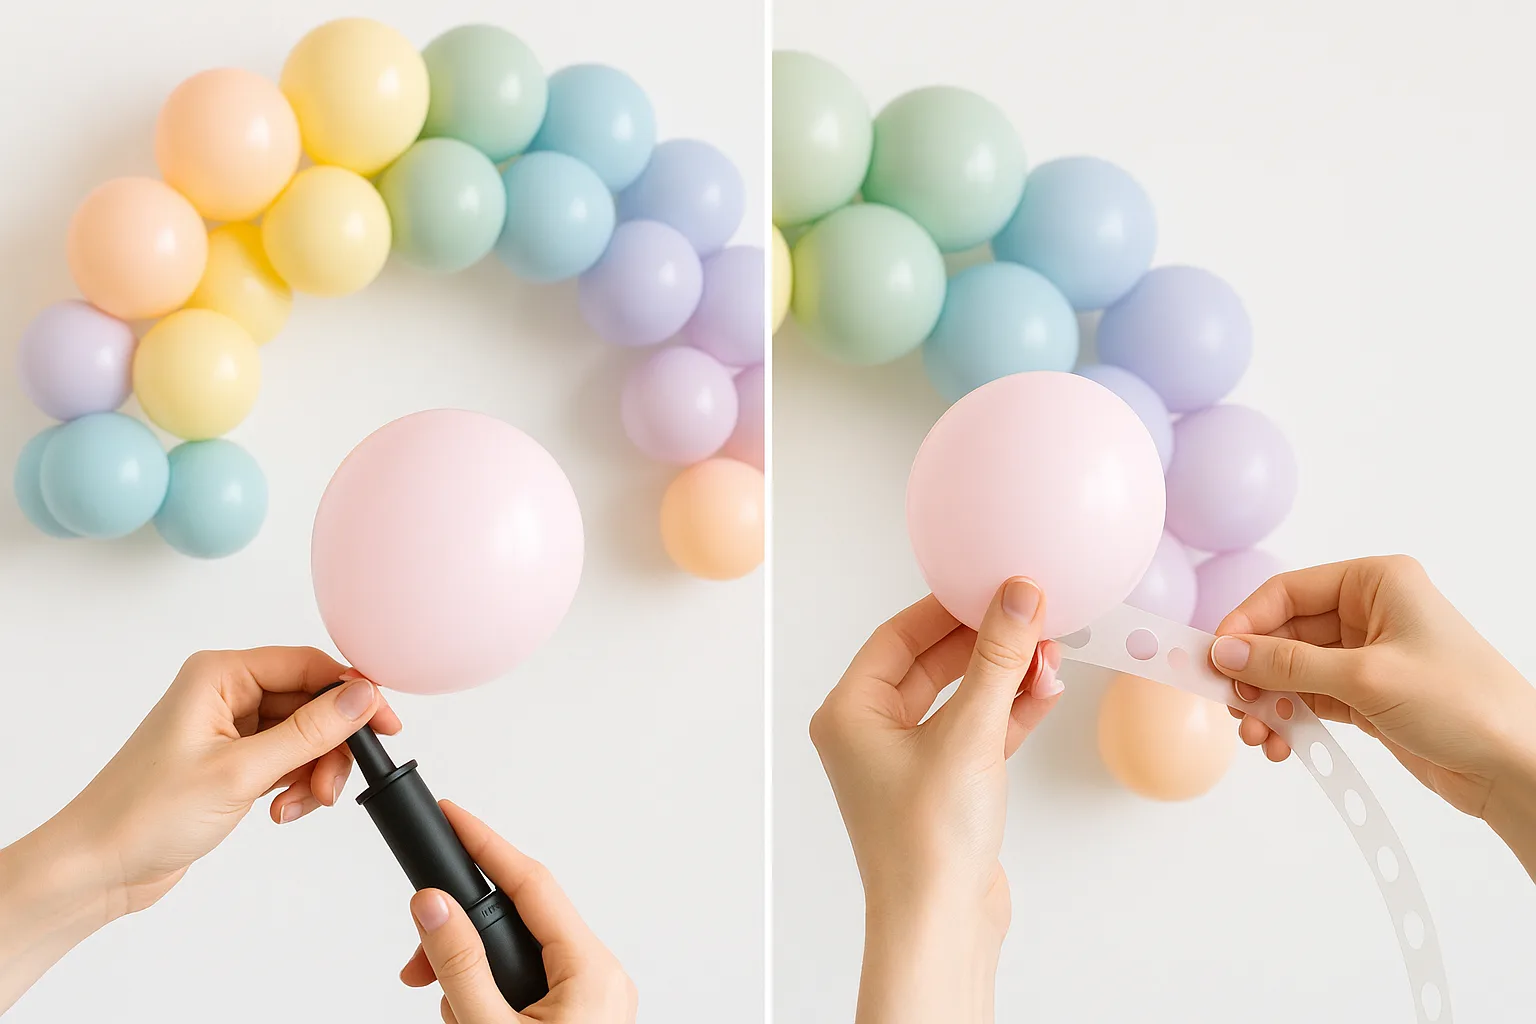
Step 1: Sort Your Balloons by Size
Most kits include 3 sizes: 5-inch (small), 10-12 inch (medium), and 18-inch (large/jumbo). Sort them into piles by size AND color before you start inflating. This saves a ton of time later.
Pro tip: Inflate the 18-inch balloons first — they're your anchor pieces and take the longest.
Step 2: Inflate (But Not All the Way!)
This is the secret to a professional-looking arch: vary the sizes within each balloon size. Don't inflate every 12-inch balloon to the same size. Make some 10 inches, some 11, some the full 12. This creates organic, natural-looking dimension.
- 5-inch balloons: Inflate to 3-5 inches (these fill gaps)
- 10-12 inch balloons: Inflate to 8-12 inches (mix of sizes!)
- 18-inch balloons: Inflate to 14-18 inches (these are your "wow" pieces)
Timing Tip
Inflate balloons the morning of the party (or the night before at the earliest). Latex balloons slowly deflate over 12-24 hours. Air-filled balloons (no helium) last longer than helium, but they still look best fresh.
Step 3: Thread Balloons onto the Strip
The balloon strip tape has evenly-spaced holes. Push the tied end of each balloon through a hole — the knot catches and holds it in place. Don't fill every hole — skip holes to create a more organic shape.
Pattern tip: Work in clusters of 3-4 same-color balloons, then switch colors. This creates a color-blocked look. For a mixed/confetti look, alternate colors randomly.
Size placement: Put large balloons at the bottom/center and smaller ones toward the ends. This creates the classic tapered arch shape.
Step 4: Fill the Gaps
This is what separates amateur arches from pro-looking ones. Use the 5-inch mini balloons and the glue dots from your kit to fill every visible gap. Stick a glue dot on the balloon, then press it into a gap between larger balloons.
Keep adding small balloons until you can't see any of the strip tape. The arch should look full, round, and organic from every angle.
Step 5: Mount It
You have several mounting options:
- Wall arch: Use command strips to attach the strip tape to the wall in an arch shape. Start from one side, go up and over, and down the other side. Best for behind a dessert table or photo backdrop.
- Doorway arch: Same technique but across a doorway. Tape strip to both sides of the door frame.
- Freestanding: Attach the strip to PVC pipe bent into an arch shape, anchored in heavy pots or buckets with sand/rocks.
- Half arch: Mount only one side high and let the other cascade down to the floor. Modern and dramatic!
Step 6: Add Finishing Touches
Tuck in greenery, dried flowers, or other theme elements for the final touch. Eucalyptus garlands woven through a boho arch look stunning. Add fairy string lights for an evening shower. Fresh flowers can be tucked in last-minute for pops of color.
Common Mistakes to Avoid
- All same-size balloons: Vary the inflation sizes for an organic look
- Not enough balloons: A full arch typically needs 100-150 balloons. Don't skimp!
- Visible strip tape: Fill every gap with small balloons and glue dots
- Inflating too early: Day-of or night-before only
- Using helium: Helium balloons float up and won't hold the arch shape. Air-filled is what you want!
- Skipping the hand pump: 100 balloons by mouth = passing out. Get a pump.
Balloon Arch by Theme
Already know your shower theme? Jump to the full DIY guide with the matching balloon arch:
Boho Rainbow
Muted dusty pink, sage, mustard, slate blue
Taco Fiesta
Hot pink, orange, lime green, gold
Little Cutie Citrus
Orange, golden yellow, sage green
The Perfect Shower Gift
While you're DIYing the decorations, don't forget the gift! The MomEZ Hands-Free Baby Bottle Holder is the practical gift new parents love. Under $20.
This post contains affiliate links. If you purchase through these links, we may earn a small commission at no extra cost to you.
Dr. Judith Mendez , MD, Pediatrician, Board-Certified
Dr. Judith Mendez is a board-certified pediatrician with over 15 years of experience caring for newborns, infants, and children. She is passionate about helping new parents navigate the joys and challenges of parenthood with evidence-based guidance.

